

Getting Started with Mixed Media Art
If you’re looking to explore the world of mixed media art, you’re in for a treat. And if you’ve already tried your hand at mixed media art, you may be excited and inspired, but also a little confused or frustrated. After all, everything has a learning curve, and there are just some things you don’t know that you don’t know!
Mixed media art combines various materials, techniques, and mediums to create unique and visually captivating artworks – but you may wonder: How do I do certain techniques? What supplies do I need? How do I use those supplies? What about basic art skills – which ones are most important for me to practice? In this post, I am going to answer those questions – and more. Let’s get started with what mixed media art is and some essential supplies that you’ll want to have on hand to get started.
What Makes Mixed Media Art Different?
Mixed media art allows you to combine different materials and techniques to create beautiful and textured artworks. It offers endless possibilities for experimentation and encourages artists to think outside the box. With mixed media, you can incorporate elements such as painting, drawing, collage, printmaking, assemblage, and more to create your artworks.
Because of this, you can tell stories, evoke emotions, and explore themes in unique and unconventional ways. Whether you’re interested in creating abstract compositions, realistic portraits, or thought-provoking conceptual pieces, mixed media provides a wide range of tools and techniques to bring your visions to life.
Essential Supplies for Beginners
To get started with mixed media art, you’ll need a few essential supplies to help you unleash your creativity. Here are some must-have items for beginners:
| Supplies | Description |
|---|---|
| Mixed Media Sketchbook | A sketchbook specifically designed for mixed media art, with sturdy pages that can withstand various techniques and mediums. This will be good for experimenting with different ideas without having to worry about creating a whole finished piece. |
| Acrylic Paints | Versatile and quick-drying, acrylic paints are a staple in mixed media art. They can be applied in layers, blended, or even used for collage elements. |
| Watercolor Paints | Watercolors offer transparent and fluid effects, perfect for creating delicate washes and atmospheric effects in mixed media artworks. |
| Mixed Media Paper | Heavyweight and textured paper that can handle wet and dry media. It provides a sturdy surface for mixed media techniques like painting, collage, and drawing. |
| Assorted Brushes | A variety of brushes in different shapes and sizes for applying paint, creating texture, and adding details to your mixed media artworks. |
| Gel Medium | A versatile adhesive and sealant that can be used for collage, adhering different materials, and creating texture. |
| Palette Knife | A tool for applying and manipulating paint, creating texture, and scraping away layers to reveal underlying colors and textures. |
| Pencil/Pencil Set | A range of graphite pencils for sketching, shading, and creating initial outlines in your mixed media artworks. A mechanical pencil is also very useful. |
| Scissors | Essential for cutting and shaping various materials for collage work in mixed media art. |
| Assorted Papers and Fabrics | Collect a variety of papers, textured fabrics, and other materials to use in your mixed media collages and assemblages. |
These supplies will provide a solid foundation for your mixed media art journey. As you progress and experiment with different techniques, you may find yourself adding more materials and tools to your collection.
Now that you have an understanding of mixed media art and the essential supplies to get started, it’s time to check out various techniques, experiment with different mediums, and get creative. In the next sections, we’ll talk about layering and collage, texture and dimension, color theory, composition, and much more to help you create the best possible mixed media works.
Exploring Techniques
When it comes to creating mixed media art, trying various techniques can take your artwork from basic to beautiful. In this section, I will talk about three key techniques: layering and collage, texture and dimension, and incorporating found objects.
Layering and Collage
Layering and collage are fundamental techniques in mixed media art that allow for the combination of different materials and elements to create visually interesting artworks. By layering various materials, such as paper, fabric, photographs, and ephemera, you can add depth and complexity to your artwork.

Layering in mixed media art offers endless possibilities for experimentation and creativity. It allows you to build upon different textures, colors, and patterns. The process of layering can involve applying paint, gluing materials, and adding transparent or translucent layers to achieve different effects.
Collage, on the other hand, involves combining various pre-existing images, papers, and objects to create a cohesive composition. Collage techniques can be used to convey a specific theme or tell a story within your mixed media art. You can experiment with tearing, cutting, and arranging different elements to create visually striking juxtapositions.
Texture and Dimension
Texture and dimension add visual interest and tactile appeal to mixed media art. Creating texture can bring about different emotions and sensations, making your artwork more engaging and interactive.

Texture in mixed media art creates a sensory experience – you know when you see a work of art, and you just want to reach out and touch it, even though you know you shouldn’t? This is one of the things that makes mixed media so fun. You can achieve texture through various techniques such as layering gesso, applying modeling paste, using textured papers, or adding natural elements like sand or fibers. These techniques allow you to create a range of surfaces, from smooth to rough, enhancing the overall composition of your artwork.
Dimension, on the other hand, refers to creating a sense of depth and three-dimensionality in your mixed media art. By combining different materials, techniques, and perspectives, you can make your artwork multidimensional. Embossing, stamping, or using three-dimensional objects are some of the ways mixed media artists achieve dimensional effects.
Incorporating Found Objects
Incorporating found objects into your mixed media art can add a unique and personal touch to your creations. Found objects are everyday items or materials that you repurpose and integrate into your artwork, giving them new life and meaning.
These objects can range from vintage photographs, buttons, old keys, scraps of fabric, or even natural elements like leaves or shells. The incorporation of found objects can add a sense of narrative, nostalgia, or surprise to your artwork, making it truly one-of-a-kind.

As you explore and experiment with these techniques – layering and collage, texture and dimension, and incorporating found objects – you’ll discover endless possibilities for expressing your creativity. Remember to embrace the process of experimentation, allowing your intuition and imagination to guide you. For inspiration and examples of mixed media art, check out our article on mixed media art examples.
Color and Composition
When it comes to mixed media art, understanding color theory and composition is essential for creating visually captivating and harmonious pieces. In this section, we will explore the basics of color theory and how to create balanced compositions in your mixed media art.
Color Theory Basics
Color theory plays a fundamental role in any artistic endeavor. It helps artists understand how colors interact with each other and how they can be used to evoke specific emotions and moods. By familiarizing yourself with color theory, you can make informed choices when selecting and combining colors in your mixed media artwork.
There are various color theory resources available, such as Johannes Itten’s book, “The Elements of Color” and Josef Albers’ “Interaction of Color.” These books delve into the principles and concepts of color, including color harmony, contrast, and the emotional and psychological effects of different colors.
I have a personal funny story about the Josef Albers book. My art mentor, Jim, came across the book and we were going through it one day during a lesson. Albers was explaining how one color next to another can change the colors visually. I remember Jim laughing incredulously and saying how this guy was full of it and didn’t know what he was talking about. I came back another day and Jim had shot the book with a real bullet and mounted it on an old canvas with some paint. It’s just the kind of stuff he does.
Fast forward, maybe a few weeks or months – and we are sitting critiquing a painting that Jim had done. We both said some version of how one of the colors he used made another color change in relation to it. We both just stared at each other with the same thought, and Jim said it out loud. “I’ll be damned!,” he exclaimed. “That hack Josef Albers is a genius!” He took the book off the canvas where it had been hanging and removed the bullet. “I’ll put this at my bedside for nightly reading.” After this, every time color did something funny in a painting, we would just look at each other and say, “Damn that genius Josef Albers.”
That hack Josef Albers is a genius!” my art mentor, Jim.
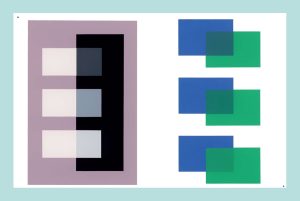
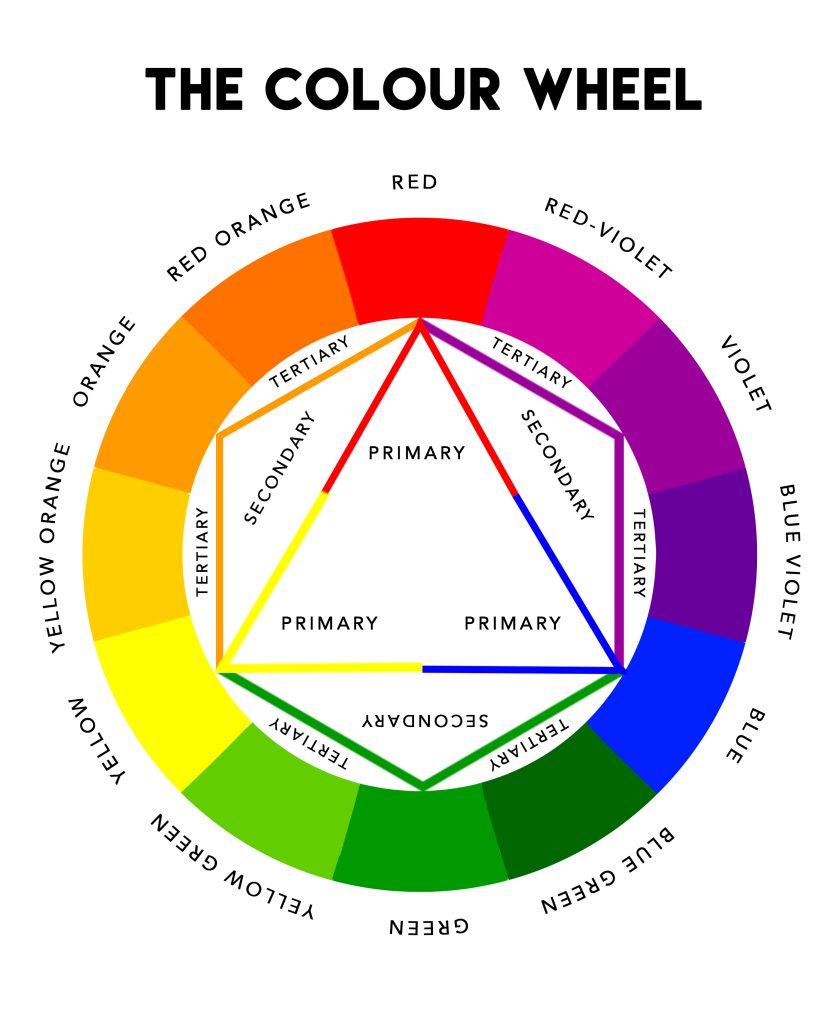
As a mixed media artist, you have the freedom to experiment with different color combinations and explore the impact they have on your artwork. Consider incorporating complementary colors, analogous colors, or even monochromatic palettes to create striking visual effects. Remember to consider the mood and message you want to convey through your artwork when selecting your color palette. A color wheel is a great tool to use to help you decide which colors to use.
Creating Balanced Compositions
Composition refers to the arrangement of elements within a work of art. In mixed media art, composition plays a crucial role in creating a visually balanced and engaging piece. A well-composed artwork can guide the viewer’s eye around the painting and highlight or minimize certain areas or objects.
To create balanced compositions, it’s important to consider the placement and arrangement of various elements, such as papers, textures, objects, and colors. One helpful resource on composition is the book “Design Basics” by David A. Lauer. It explores the principles of design, including balance, rhythm, and emphasis, which can be applied to mixed media art.
One approach to achieving a balanced composition is through the use of the rule of thirds. You’ve probably heard of this term before, especially if you’re an artist, and for good reason. For some reason, sticking to this principle creates Magic in your painting. It sounds silly, but I promise, cross my heart, it’s true! If you’re unsure what the rule of thirds is, this rule involves dividing your artwork into a grid of nine equal sections and placing key elements along the intersecting lines or at their points of intersection. This technique helps to create visual interest and balance within your composition.
Experiment with different arrangements, layering techniques, and focal points to find the composition that best suits your artistic vision. Remember that composition is subjective and can vary depending on the style and message you want to convey through your mixed media art.
So, what does all this mean for you, the artist?
By understanding color theory and mastering composition techniques, you can create more complex and interesting mixed media pieces. Don’t be afraid to explore different color palettes and experiment with various composition arrangements. The possibilities are endless, and these foundational principles will help guide you.
[1]: Itten, Johannes. “The Elements of Color: A Treatise on the Color System of Johannes Itten Based on His Book The Art of Color.” John Wiley & Sons, 1970. [2]: Albers, Josef. “Interaction of Color.” Yale University Press, 2006. [3]: Lauer, David A. “Design Basics.” Cengage Learning, 2017.Mixed Media Surfaces
When it comes to creating mixed media art, choosing the right surface (or substrate) is essential for achieving the desired results. The surface you work on can greatly impact the overall look and feel of your artwork. In this section, we will explore the importance of choosing the right substrate and the steps involved in preparing surfaces for mixed media.
Choosing the Right Substrate
Selecting the best surface for your mixed media art is crucial for the success of your project. Different surfaces offer various textures, absorbency levels, and durability, allowing you to experiment and create unique effects. Here are a few factors to consider when choosing a substrate:
- Texture: The texture of the surface can add depth and interest to your artwork. Smooth surfaces provide a clean and even base, while rougher textures can create more organic and tactile effects.
- Absorbency: The absorbency of the surface determines how well it accepts and holds different mediums. Some surfaces, like watercolor paper, are designed to absorb water-based materials, while others, like canvas, may require priming to prevent excessive absorption.
- Durability: Consider the durability of the substrate, especially if you plan to use heavy or abrasive techniques. Sturdier surfaces, such as wood panels or heavy-duty paper, can withstand more manipulation without warping or tearing.
To help you make an informed decision, refer to resources like “What’s the Best Surface for Your Mixed-Media Art?” (Cloth Paper Scissors). It will provide valuable insights and recommendations on various substrates suitable for mixed media art.
Preparing Surfaces for Mixed Media
Once you’ve selected the appropriate substrate, it’s important to prepare the surface before applying your mixed media materials. Proper preparation ensures better adhesion, longevity, and overall quality of your artwork. Here are some general steps to follow when preparing surfaces for mixed media:
- Clean the Surface: Start by cleaning the surface to remove any dust, dirt, or debris. Use a soft cloth, soft dry brush, or sponge and a mild solution of water and gentle soap, if necessary. Ensure that the surface is completely dry before proceeding.
- Prime the Surface: Depending on the substrate, you may need to apply a primer or gesso. Priming creates a uniform and absorbent surface for your mixed media materials. It also helps prevent the substrate from absorbing too much moisture and warping. Follow the manufacturer’s instructions for the specific primer or gesso you are using.
- Sand or Smooth the Surface: If desired, you can lightly sand the surface to create a smoother texture or remove any imperfections. Use fine-grit sandpaper and be gentle to avoid damaging the substrate.
- Apply a Base Layer: Consider applying a base layer of paint or collage elements to establish a foundation for your artwork. This can add visual interest and create a starting point for your mixed media composition.
By carefully selecting the right substrate and properly preparing your surfaces, you can set the stage for successful and visually appealing mixed media art. Experiment with different materials, techniques, and surfaces to discover your own unique artistic style.
Tools of the Trade
When it comes to creating mixed media art, having the right tools is essential. In this section, we will explore the importance of brushes and applicators, as well as the value of experimenting with different tools in your creative process.
Brushes and Applicators
Brushes and applicators play a crucial role in the creation of mixed media art. They allow you to apply various materials and create different textures and effects. The type of brush or applicator you choose depends on the specific technique you want to achieve and the materials you are working with.
To get started with brushes, it is recommended to have a variety of sizes and shapes. This will allow you to experiment with different strokes and create diverse textures in your artwork. Synthetic brushes are often preferred for mixed media art as they can withstand the use of various mediums and are easier to clean.
Applicators, on the other hand, offer alternative ways to apply materials to your artwork. Popular applicators include palette knives, sponges, and even unconventional objects like credit cards or toothbrushes. Each applicator provides a unique texture and mark-making potential, allowing you to add depth and interest to your mixed media pieces.
Experimenting with Different Tools
While brushes and applicators are essential, exploring beyond traditional tools can open up new possibilities in your mixed media art. Embracing unconventional tools can lead to exciting discoveries and unique effects in your artwork.
Consider incorporating tools such as stencils, stamps, or even everyday objects found around your home. These tools can add interesting patterns and textures to your mixed media pieces. You can experiment with using bubble wrap, lace, or even leaves to create captivating effects and impressions.

Furthermore, exploring tools beyond the brush can also involve using heat tools like heat guns or embossing tools to add dimension and texture to your artwork. These tools can help you achieve stunning effects with embossing powders and other heat-activated mediums.
By incorporating a variety of brushes, applicators, and experimenting with different tools, you can elevate your mixed media art and discover new ways to express your creativity. Remember to embrace curiosity, explore, and have fun as you embark on your artistic journey.
Adding Mixed Media Elements: Text, Photos & Images
When it comes to mixed media art, incorporating different elements can add depth and interest to your artwork. Two popular ways to enhance your mixed media pieces are by adding text and incorporating photos and images.
Adding Text
Text can be a powerful addition to your mixed media art, allowing you to convey messages, quotes, or personal thoughts. There are several ways you can incorporate text into your artwork:
- Handwriting or Calligraphy: Use your own handwriting or explore calligraphy styles to write words or phrases directly onto your piece. Experiment with different pens, markers, or brushes to achieve the desired effect.
- Stamps and Stencils: Utilize stamps or stencils with pre-designed letters or words to add text elements. This allows for more precise and consistent lettering. Consider using alphabet stamps or adhesive stencils for a clean and professional look.
- Collage and Typography: Cut out letters or words from magazines, newspapers, or printed materials to create collaged text elements. Mix and match different fonts and sizes to create visually appealing compositions.
Remember, the choice of text should align with the theme or message you want to convey in your artwork. It can be a single word, a meaningful quote, or even a narrative that complements the visual elements of your piece.
Incorporating Photos and Images
Photos and images can bring a new dimension to your mixed media art, adding a personal touch or providing a visual reference. Here are a few ways to incorporate them into your artwork:
- Collage: Cut out images from magazines, old photographs, or printed materials and layer them onto your artwork. Blend them with other elements such as paint, paper, or fabric to create a cohesive composition.
- Transfers: Use image transfers to transfer photos or printed images onto your mixed media piece. There are various techniques available, including gel medium transfers or solvent transfers, that allow you to transfer images onto different surfaces.
- Digital Printing: Print photos or images directly onto specialty papers or fabric sheets designed for inkjet printers. This technique enables you to incorporate high-quality, customized images into your artwork.
When incorporating photos and images, consider the size, placement, and integration with other elements in your artwork. Experiment with layering, transparency, and blending techniques to achieve the desired effect.
Adding text and incorporating photos and images are just a few ways to elevate your mixed media art. Feel free to explore and combine different techniques to create unique and visually engaging pieces. For more inspiration and ideas, check out our article on mixed media art examples or dive into the world of abstract mixed media art.
Mixed Media Finishing Touches
To truly elevate your mixed media art and give it that extra touch of finesse, adding finishing details and applying sealants or varnishes is essential. These final steps can enhance the overall appearance, protect your artwork, and give it a professional finish.
Adding Finishing Details
Adding finishing details is where you can really let your creativity shine. This step involves adding those final touches that bring your artwork to life and make it uniquely yours. Some techniques you can consider include:
- Highlighting: Use a fine brush or a fine-tip marker to add highlights or accents to specific areas of your artwork. This can help create depth and draw attention to certain elements.
- Ink Outlining: Consider using ink pens or markers to outline or define certain areas of your artwork. This technique can add definition and create a visual contrast between different parts of your composition.
- Splatter Effects: For a dynamic and textured look, you can create splatter effects by flicking paint or ink onto your artwork. This technique can add movement and visual interest to your piece.
- Stenciling: Incorporate stencils to add patterns or designs to your artwork. Stencils can be used with various mediums such as paint, ink, or texture paste to create unique and intricate details.
Remember, the finishing details should complement your overall composition and enhance the story or message you want to convey through your artwork. Don’t be afraid to experiment and try new techniques that align with your artistic vision.
Sealants and Varnishes
Once you are satisfied with the finishing details of your mixed media art, it’s important to protect your masterpiece by applying sealants or varnishes. These products serve multiple purposes, including preserving the integrity of your artwork and providing a protective layer against environmental factors.
Sealants and varnishes come in different forms, such as sprays or brush-on formulas. Before applying any sealant or varnish, make sure your artwork is completely dry. Here are a few key benefits of using sealants and varnishes:
- Protection: Sealants and varnishes create a barrier that protects your artwork from dust, dirt, moisture, and UV rays. This helps prevent fading, discoloration, and damage over time.
- Enhancement: Some sealants and varnishes have properties that can enhance the colors, contrast, and overall appearance of your artwork. They can deepen the tones and make the colors appear more vibrant.
- Surface Evenness: Applying a sealant or varnish can help even out the surface texture of your artwork, especially if you have used different mediums or techniques. This can provide a consistent finish and make your artwork look more polished.
When choosing a sealant or varnish, consider factors such as the desired finish (matte, satin, or glossy), the compatibility with your chosen mediums, and the longevity you desire for your artwork. It’s always a good idea to test the sealant or varnish on a small, inconspicuous area of your artwork before applying it to the entire piece.
By adding finishing details and applying sealants or varnishes, you can take your mixed media art to the next level. These final touches not only enhance the visual impact of your artwork but also help preserve and protect it for years to come. So, don’t rush through these steps and take the time to give your masterpiece the attention it deserves.
Inspiration and Ideas
With mixed media art, finding inspiration is key. Exploring new ideas and prompts can ignite your creativity and push your artistic boundaries. Here are some tips on finding inspiration and creative mixed media prompts to get you started on your artistic journey.
Finding Inspiration
Finding inspiration for your mixed media art can come from a variety of sources. Here are a few ideas to help spark your imagination:
- Nature: Take a walk in nature and observe the colors, textures, and patterns that surround you. The organic shapes and vibrant hues can inspire unique elements for your artwork.
- Art Exhibitions: Visit local art exhibitions or explore online galleries to see the work of other artists. Pay attention to different techniques, compositions, and themes that resonate with you.
- Books and Magazines: Dive into art books and magazines that feature mixed media artists. Discover new techniques, materials, and styles that you can incorporate into your own artwork.
- Music: Listen to your favorite music or explore new genres. Allow the melodies and lyrics to evoke emotions and translate them into visual expressions.
- Personal Experiences: Reflect on your own life experiences, memories, and emotions. Use them as a starting point for creating meaningful and personal mixed media pieces.
Remember, inspiration can be found anywhere, so keep an open mind and let your surroundings inspire your creativity. For more specific mixed media art ideas and examples, check out our article on mixed media art examples.
Creative Mixed Media Prompts
Sometimes, all you need is a little nudge to get your creative juices flowing. Here are some creative mixed media prompts to help you generate ideas and experiment with different techniques:
- Collage Exploration: Create a mixed media collage using a combination of found objects, paper, fabric, and paint. Play with different textures, colors, and layers to tell a unique visual story.
- Abstract Expression: Use abstract shapes, lines, and colors to create a mixed media painting that expresses your emotions or a specific theme. Experiment with different materials and mark-making techniques to add depth and visual interest.
- Vintage Inspiration: Incorporate vintage elements, such as old photographs, vintage papers, or ephemera, into your mixed media artwork. Blend them with contemporary elements to create a juxtaposition of old and new.
- Nature-Inspired Texture: Collect natural materials like leaves, twigs, or shells, and use them to create texture in your mixed media art. Experiment with different adhesives and techniques to incorporate these elements seamlessly.
- Word Play: Explore the use of text and typography in your mixed media artwork. Incorporate meaningful quotes, poetry, or lyrics that resonate with your artistic vision.
These prompts are just a starting point. Feel free to adapt and modify them to suit your personal style and interests. Remember, the goal is to have fun, experiment, and let your creativity guide you on your mixed media art journey.
By finding inspiration and embracing creative prompts, you can elevate your artistry and explore new possibilities in the world of mixed media. So, grab your supplies, let your imagination run wild, and create mixed media artworks that truly reflect your unique vision.
Wrap Up
I hope you enjoyed this overview of mixed media art and that you now feel inspired and confident that you can get started. It may seem like a lot all at once, but if you are new at this and take it step by step, it will all come together in ways you haven’t even thought of! I promise! You can return to this post again and again as you create your artworks and have questions and areas where you get stuck. Also, if you find yourself dealing with a particular issue and can’t figure it out, feel free to leave me a comment and I’ll be happy to answer.
Good Luck and have fun!
- Art That Heals: The Mental Magic of Mixed Media - August 20, 2024
- The Fundamentals of Mixed Media Art: How to Create Art That Inspires - August 14, 2024
- From Chaos to Creation: 3 Experimental Mixed Media Painting Techniques to Try - June 24, 2024